SUMMARY
This is AI generated summarization, which may have errors. For context, always refer to the full article.

MANILA, Philippines – Recently, hundreds of Filipinos, including students, activists, and journalists, reported finding dummy Facebook accounts bearing their exact usernames. This string of incidents has caused users to feel uneasy about their privacy and security on the platform, with a number demanding quick action from the social media giant.
Facebook came out with a statement later on, saying that they haven’t found anything malicious with the reported accounts. The National Privacy Commission on Tuesday, June 16, held a closed-door meeting with Facebook regarding the issue, but no information has come out yet from their discussion.
Some believe the best way now to stay safe is to deactivate your account and leave Facebook entirely. However, that’s easier said than done when a large chunk of your life’s memories are captured in the photos and videos you uploaded through the years you were on the site. So how do you save all of them before you log off for good?
Thankfully, Facebook late last year started rolling out a neat tool that lets you easily transfer your photos and videos to Google Photos as part of a joint open-source effort to give users more control of their data. The tool rolled out globally on June 4, 2020, some months after being introduced in limited countries in December 2019.
So starting this month, it’s now available for everyone and can help you leave the platform while still keeping all your files intact. But even though you’re not ready to quit Facebook just yet, it might be good to back-up all your files, just in case you get hacked or decide to also leave one day.
Here’s a step-by-step guide on how to do it:
Step 1: Head on over to the Settings tab of your Facebook account.
If you’re on a browser, you can find it in the drop down menu when you click the down-pointing arrow on the top right corner of the page. If you’re on the mobile app, tap the hamburger menu (it’s the one with 3 horizontal, parallel bars).
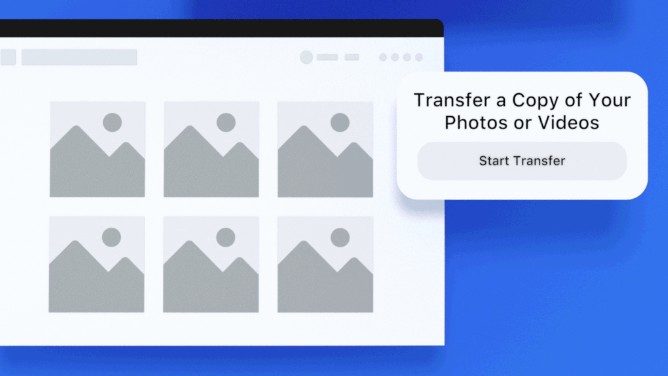
Step 2: Click Your Facebook Information, then click Transfer a Copy of Your Photos or Videos.
Step 3: Enter your Facebook password.
Step 4: Select the destination for your files.
As of writing, Google Photos is the only place you can transfer your photos and videos to, but Facebook said they’re working to add more in the future.
After that, choose if you want to transfer your photos or your videos first as they cannot be transferred at the same time. However, you can always just repeat this whole process when you’re through migrating whichever one you select first.
Then click Next and grant Facebook permission to migrate your files to your Google Photos account.
You’ll also be asked to log in to your Google account if you haven’t yet.
Step 5: Finally, hit Confirm Transfer to start the process.
Be warned, the transfer can take a while, especially if you have a lot of photos or videos.
Pay attention too to the amount of storage you’re going to need since Google only gives you 15GB worth of space across your whole account, which includes Gmail and Google Drive.
When it’s finished transferring, you can log into your Google Photos to check. You’ll find that your photos are arranged and sorted into folders the same way they are on Facebook. – Rappler.com
Add a comment
How does this make you feel?
There are no comments yet. Add your comment to start the conversation.